How To Use MERN Stack: A Complete Guide
Nauman Pathan
August 05, 2022 889 Views
Quick Summary : This is a complete guide to using the MERN stack tutorial. In this lesson, we will use the technologies MongoDB, Express, React, and Node.js to develop a simple application.
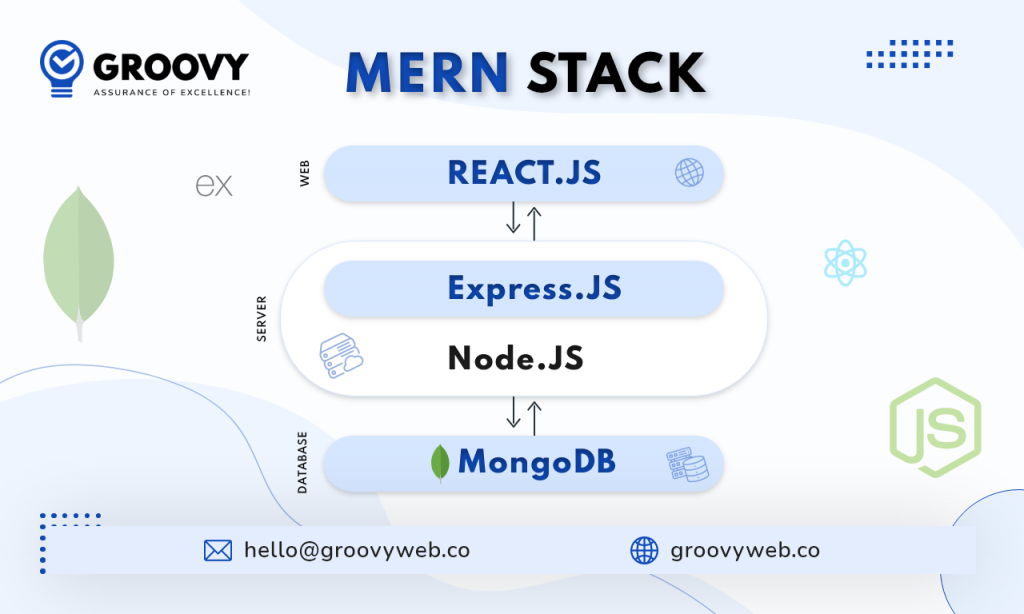
The 4 technologies MongoDB, Express, React/Redux, and Node.js make up what is known as the MERN Stack. When developing cutting-edge, single-page web apps, the MERN Stack is one of the most widely used JavaScript stacks. Working with React to develop the display layer, Express, Node to make up the middle or application layer, and MongoDB to produce the database layer is all part of the MERN stack tutorial via Groovy Web.

In this MERN stack tutorial, we will use these four technologies to construct a simple application capable of recording information about workers and then displaying it using React. The application will then show the information.
Tutorial on How to Begin Utilizing the MERN Stack
The following steps need to be taken before you can get started:
- Install Node
- Download the Long-Term Support (LTS) or the most recent version to install Node.
- Maintain or Setup a Source Code Editor
For the sake of this lesson, you are free to use whatever text editor you choose. The VS Code editor, together with the plugin’s prettier and vs. code icons, will be what we use, however, so that we can demonstrate anything.
Putting the MERN Stack Project in Motion
To develop full-stack solutions thanks to MERN. As a result, to use all of its capabilities, we will MERN Stack project. In the course of working on this project, we are going to develop both a backend and a frontend. React will be used in the frontend development, while MongoDB, Node, and Express will be utilized in the backend development. We will refer to these entities as the frontend client and the backend server
Create a directory with no contents called MERN. After we have created a new project, all of our files will be stored in this folder. After that, we will develop a client application using React Native.
mkdir mern
cd mern
npx create-react-app client
Following that, we will create a folder for the back end and give it the name server
mkdir serverNext, we will construct the server by moving inside the server folder we made earlier in the process. After that, we will use npm init to get package.json up and running.
cd server
npm init -y
In addition to that, we will install the prerequisites.
npm install MongoDB express cors dotenvThe preceding command makes use of the following keywords
Installing the MongoDB database driver using the MongoDB command enables your Node.js apps to connect to the database and operate with data.
Installing the web framework for Node.js using Express is possible. (It will make things simpler for both of us.)
cors will install a package for Node.js that enables sharing resources across different origins.
Dotenv is a command that installs a module that imports environment variables from a.env file into the corresponding process.env file. Because of this, you can keep configuration files separate from the code.
Using the package.json file, we can examine the dependencies that have been installed.
It needs to list the packages along with the versions of those packages. When we are certain that the prerequisites have been correctly installed, we populate a file that we will later refer to as server.js with the following code:
mern/server/server.js
const express = require("express");
const app = express();
var cors = require("cors");
require("dotenv").config({ path: "./config.env" });
const port = process.env.PORT || 5000;
app.use(cors());
app.use(express.json());
app.use(require("./routes/record"));
/ obtain driver connection
var dbo = require("./db/conn");
app.listen(port, () => {
/ Establish a connection to the database when the server begins
dbo.connect to server(function (err) {
if (err) console.error(err);
});
console.log('Server is operating on port: $port');
});
Express and cors are both required to be utilized in this context. The port variable needed in the config.env file may be accessed using the const port process.env.port directive.
Establishing a Connection to MongoDB Atlas
It is time to establish a connection between our server and the database. As the database, we will be making use of MongoDB Atlas.
MongoDB Atlas is a database service hosted in the cloud and delivers high levels of data security and dependability.
You can use a portion of MongoDB Atlas’s features and capabilities by using the free tier cluster that MongoDB Atlas offers. This cluster does not expire.
The Get Started with Atlas tutorial will walk you through the steps of creating an account, deploying your first cluster, and locating the connection string for your cluster.
Once you have the connection string in hand, go to the directory labelled “server” and create a file with the name “config.env.” The connection string should be assigned to a new variable named ATLAS_URI.
When you are finished, the format of your file should be similar to the one seen below. Change <username> and <password> to reflect the username and password you use to access your database mern developer.
ATLAS_URI=mongodb+srv://<username>:<password>@sandbox.jadwj.mongodb.net/employees?retryWrites=true&w=majority
PORT=5000
Under the server directory, make a folder called database, and then create a file called conn.js inside of that folder. When we get to that point, we can connect to our database by adding the code below.
mern/server/db/conn.js
const { MongoClient } = require("mongodb");
const Db = process.env.ATLAS_URI;
const client = new MongoClient(Db, {
  useNewUrlParser: true,
  useUnifiedTopology: true,
});
var _db;
module.exports = {
  connectToServer: function (callback) {
    client.connect(function (err, db) {
      // Verify we got a good "db" object
      if (db)
      {
        _db = db.db("employees");
        console.log("Successfully connected to MongoDB.");
      }
      return callback(err);
         });
  },
  getDb: function () {
    return _db;
  },
};
Endpoints for the Server API
Database done. Server done. The next stop on our journey is the endpoint for the Server API. Let’s get things rolling by creating a routes folder and putting record.js inside. Return to the directory you called “server,” and then create the new directory and file as follows:
cd ../server
mkdir routes
touch routes/record.js
The following lines of code will also be included in the routes/record.js file that you create.
mern/server/routes/record.js
const express = require("express");

// recordRoutes is an instance of the express router.
// We use it to define our routes.
// The router will be added as a middleware and will take control of requests starting with path /record.
const recordRoutes = express.Router();

// This will help us connect to the database
const dbo = require("../db/conn");

// This help convert the id from string to ObjectId for the _id.
const ObjectId = require("mongodb").ObjectId;


// This section will help you get a list of all the records.
recordRoutes.route("/record").get(function (req, res) {
 let db_connect = dbo.getDb("employees");
 db_connect
   .collection("records")
   .find({})
   .toArray(function (err, result) {
     if (err) throw err;
     res.json(result);
   });
});

// This section will help you get a single record by id
recordRoutes.route("/record/:id").get(function (req, res) {
 let db_connect = dbo.getDb();
 let myquery = { _id: ObjectId(req.params.id) };
 db_connect
   .collection("records")
   .findOne(myquery, function (err, result) {
     if (err) throw err;
     res.json(result);
   });
});

// This section will help you create a new record.
recordRoutes.route("/record/add").post(function (req, response) {
 let db_connect = dbo.getDb();
 let myobj = {
   name: req.body.name,
   position: req.body.position,
   level: req.body.level,
 };
 db_connect.collection("records").insertOne(myobj, function (err, res) {
   if (err) throw err;
   response.json(res);
 });
});

// This section will help you update a record by id.
recordRoutes.route("/update/:id").post(function (req, response) {
 let db_connect = dbo.getDb();
 let myquery = { _id: ObjectId(req.params.id) };
 let newvalues = {
   $set: {
     name: req.body.name,
     position: req.body.position,
     level: req.body.level,
   },
 };
 db_connect
   .collection("records")
   .updateOne(myquery, newvalues, function (err, res) {
     if (err) throw err;
     console.log("1 document updated");
     response.json(res);
   });
});

// This section will help you delete a record
recordRoutes.route("/:id").delete((req, response) => {
 let db_connect = dbo.getDb();
 let myquery = { _id: ObjectId(req.params.id) };
 db_connect.collection("records").deleteOne(myquery, function (err, obj) {
   if (err) throw err;
   console.log("1 document deleted");
   response.json(obj);
 });
});

module.exports = recordRoutes;
If you decide to execute the programme at this point, the following message will appear in your terminal while the connection is being established.
> node server.js

Server is running on port: 5000
Successfully connected to MongoDB.
That’s it for the back end. Now, we will start working on the front end.
Putting Together the Front-End
It is time to begin developing an interface for the client to communicate with the API now that you have completed the functionality you want the API to provide.
You will begin by using the create-react-app command to scaffold your application to get started with the front end of the todo app. Execute the following commands in the mern-todo directory, which is located in the same root directory as your backend code:
npx create-react-app clientThis will create a new folder named client in your mern-todo directory. This is where you will put all the React code you need.
Important the React Application to Work
Before beginning testing the React application, a number of dependencies must first be installed in the project’s root directory.
- To begin, install the following simultaneously as a development dependency:
- npm install simultaneously when using the save-dev switch
- It is possible to execute many commands simultaneously from the same terminal window by using the concurrent command.
- Install Nodemon as a development dependency after that:
- npm install nodemon —save-dev
The server is managed and controlled using Nodemon, also used to monitor it. Nodemon will automatically restart the server with the latest code version if there is any update to the server’s source code.
After that, go to the app project’s root folder, open the package.json file there, and then put the following code into it:
{
  // ...
  "scripts": {
    "start": "node index.js",
    "start-watch": "nodemon index.js",
    "dev": "concurrently \"npm run start-watch\" \"cd client && npm start\""
  },
  // ...
}
Enter the client folder and add the following key-value pair to the package.json file.
client/package.json { / … “proxy”: “http://localhost:5000” }
This proxy configuration in our package.json file enables you to perform API requests without specifying the whole URL; /api/todos will retrieve all your todos.
Open the terminal and type npm run dev. Ensure that you are in the todo directory, not the client directory.
Your application will be accessible at localhost:3000.
Create the React Components
One of the benefits of React is that it makes use of reusable components and modularizes the code. Your todo app will have two state components and one stateless Component.
Create a folder named components within your src folder, then create three files: Input.js, ListToDo.js, and ToDo.js.
Open the file Input.js and paste the following code:
import React, { Component } from 'react';
import axios from 'axios';
class Input extends Component {
  state = {
    action: '',
  };
  addTodo = () => {
    const task = { action: this.state.action };
    if (task.action && task.action.length > 0) {
      Axios
        .post('/API/todos', task)
        .then((res) => {
          if (res.data) {
            this. props.getTodos();
            this.setState({ action: '' });
          }
        })
        .catch((err) => console.log(err));
    } else {
      console.log('input field required');
    }
  };
  handleChange = (e) => {
    this.setState({
      action: e.target.value,
    });
  };
  render() {
    let { action } = this.state;
    return (
      <div>
        <input type="text" onChange={this.handleChange} value={action} />
        <button onClick={this.addTodo}>add todo</button>
      </div>
    );
  }
}
export default Input;
To utilize Axios, a Promise-based HTTP client for the browser and Node.js, you must go to the client directory from the terminal:
Cd client And run npm install Axios:
npm install AxiosThen, open your ListTodo.js file and paste the code below:
client/src/components/ListTodo.js
import React from 'react';

const ListTodo = ({ todos, deleteTodo }) => {
  return (
    <ul>
      {todos && todos.length > 0 ? (
        todos.map((todo) => {
          return (
            <li key={todo._id} onClick={() => deleteTodo(todo._id)}>
              {todo.action}
            </li>
          );
        })
      ) : (
        <li>No todo(s) left</li>
      )}
    </ul>
  );
};
export default ListTodo;
Then, you add the following code to the Todo.js file:
client/src/components/Todo.js
import Axios from 'Axios'; import Input from './Input'; import ListTodo from './ListTodo';
class Todo inherits from Component; state = todos: [], ;
componentDidMount() this.getTodos(); componentDidUnmount();
getTodos = () => { axios .get('/api/todos') . then((res) => result) if (res.data this.setState(todos: res.data, ); ). catch((err) => console.log(err)); };
deleteTodo = (id) => { axios .delete('/api/todos/${id}') . then((res)=> if (res.data) this.getTodos(); ) catch((err) => console.log(err)); };
let todos = this.state; render() let todos = this.state;
return (<div> <h1>My Todo(s)</h1> <Input getTodos={this.getTodos} /> <ListTodo todos={todos} deleteTodo={this.deleteTodo} /> </div> ); } }
export default Todo;
You must make a little tweak to your React code. Delete the logo and modify your App.js to seem as follows:
client/src/App.js \simport Import React from react, Todo from './components/Todo', and './App.css'.
const App = () => return (div className="App"> Todo/> /div>); ;
export default App;
Assuming that saving all of these files goes well, the todo app will be ready and completely functioning with all of the previously covered features, including the ability to create a task, delete a task, and see all of your tasks via mern stack development company.
Conclusion
You developed a to-do list application with the MERN stack through this lesson. You created a frontend mean stack application with React’s help, connecting with a backend application developed using Express.js. You have also developed a MongoDB backend, which will be used for storing tasks in a database.
Written by: Nauman Pathan
Nauman Pathan is a Project Manager at Groovy Web - a top mobile & web app development company. He is actively growing, learning new things, and adapting to new roles and responsibilities at every step. Aside from being a web app developer, he is highly admired for his project management skills by his clients.
Related Blog

Rahul Motwani
Progressive Web Apps Development Guide: Benefits, Cost, Characteristics & Examples
Web App Development 06 Feb 2023 15 min read
Nauman Pathan
How to Develop Cross-Platform App with Latest Tools and Frameworks
Mobile App Development 17 Oct 2023 20 min readSign up for the free Newsletter
For exclusive strategies not found on the blog
